Wednesday, March 30, 2011

Post-Synthesis Simulation Using Synplify, NC-verilog and ISE

A FPGA synthesis tool such as Synplify optimizes the design code and converts it from RTL to a post-synthesis netlist. A netlist can be

File Type

Description

.edf

Netlist for Place & Route tools

.vhm

Synthesized netlist for simulation

.vm

Synthesized netlist for simulation

.ucf

Constraints for P&R tools

For Xilinx FPGA, we may use NC-Verilog to do a post-synthesis simulation with the ISE libraries including unisims or simprim and glpl.v. For example, a script may like


ncverilog -sv -y ${XILINX}/verilog /unisims +incdir+${XILINX}/verilog/src +libext+.v ${XILINX}/verilog/src/glbl.v test.vm -f vm.f +nctop:test -w -timescale 1ns/1ns


The vm.f includes other simulation Verilog files. -sv is for system Verilog. test is the top module of Synplify synthesis.

The following links also provide good information using NC-Verilog tools for post-synthesis simulation:

http://intranet.daiict.ac.in/~vlsi/Netlist_Simulate.pdf

http://www.nalanda.nitc.ac.in/industry/appnotes/xilinx/documents/techdocs/5474.htm

http://www.xilinx.com/itp/xilinx6/books/docs/sim/sim.pdf

http://www.cse.psu.edu/~eachempa/CSE478/cg478_2005/slides/synthesis.pdf

The following link shows a Conformal FPGA and Synplify Pro Flow

http://www.xilinx.com/itp/xilinx6/books/data/docs/sim/sim0077_10.html#wp263612

Tuesday, March 29, 2011

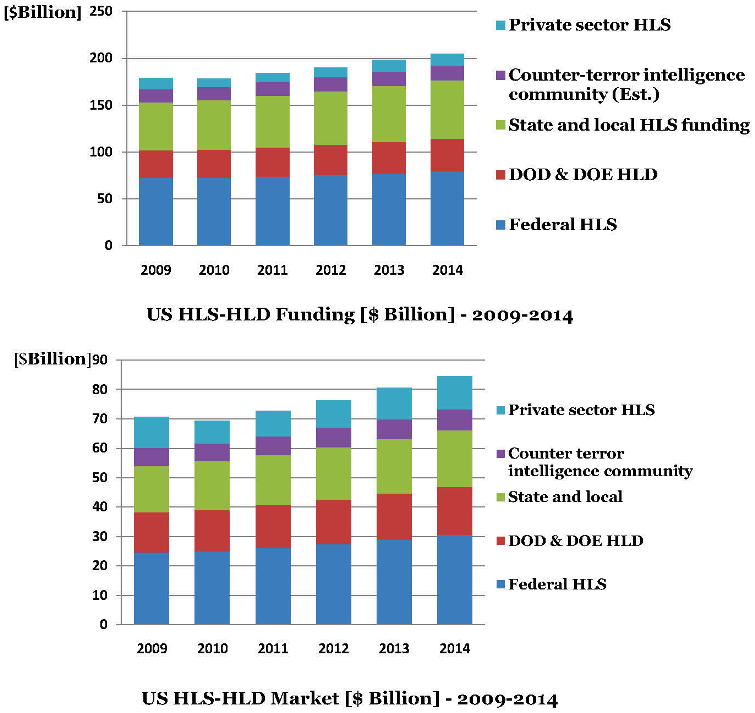
Homeland Security/Homeland Defense Market to $86 billion by 2014

U.S. HLS-HLD Funding 2011-2014
Over the next four years: the U.S. HLS-HLD (i.e. federal, state and local governments, and the private sector) funding will grow from $184 billion in 2011 to $205 billion by 2014. The market will grow from $73 billion in 2011 to $86 billion by 2014.

See more in

Monday, March 28, 2011

Manufacturers bet 3-D games can bring 3D TV sales to life

The 60.4 billion dollar global video-game industry is also counting on 3-D. At a crossroads, game publishers are looking for ways to keep their products appealing as cheaper games for mobile devices and on Facebook are eating into profits.

“You’ll start to see mainstream adoption of 3-D happening in 2011,” said Sony spokesman Dan Race. He added that the goal is for “broader saturation” of 3-D entertainment by 2014.

See more in

Sunday, March 27, 2011

Verilog HDL Reference and Tutorials

NC-Verilog Simulator and ISE

In Xilinx website, instructions are provided for simulation using NC-Verilog Simulator and ISE:


Two methods are available:

  • Using library source files with compile-time options (similar to Verilog-XL)
  • Using shared pre-compiled libraries

Please see (Xilinx Answer 2554) for information on compiling the simulation libraries for NC-Verilog


1. Using library source files with compile-time options (similar to Verilog-XL):


Depending on the makeup of the design (Xilinx instantiated primitives, CORE Generator components, etc.), for RTL simulation, specify the following at the command-line:

ncverilog -y $Xilinx/verilog/src/unisims -y $Xilinx/verilog/src/XilinxCoreLib \
+incdir+$Xilinx/verilog/src +libext+.v $Xilinx/verilog/src/glbl.v \
.v .v

The $Xilinx can be "\Xilinx\13.1\ISE_DS\ISE\" for ISE 13.1.

The "$Xilinx/verilog/src/unisims" area contains the Unified Library components for RTL simulation. The "$Xilinx/verilog/src/simprims" area contains generic simulation primitives.

For timing simulation/post-map simulation or post-translate simulation, the SimPrim-based libraries are used. Specify the following at the command-line:

ncverilog -y $Xilinx/verilog/src/simprims $Xilinx/verilog/src/glbl.v \
+libext+.v .v .v

2. Using shared pre-compiled libraries:


Simulation libraries must be compiled to before NC-Verilog is used. Please see (Xilinx Answer 2554) for instructions on compiling the Xilinx Verilog libraries.

Depending on the makeup of the design (Xilinx instantiated primitives, COREGen, etc.), for RTL simulation, edit the "hdl.var" and "cds.lib" to specify the library mapping:

# cds.lib
DEFINE unisims_ver /unisims_ver
DEFINE simprims_ver /simprims_ver
DEFINE xilinxcorelib_ver /xilinxcorelib_ver
DEFINE worklib worklib

# hdl.var
DEFINE VIEW_MAP ($VIEW_MAP, .v => v)
DEFINE LIB_MAP ($LIB_MAP, /unisims_ver => unisims_ver)
DEFINE LIB_MAP ($LIB_MAP, /simprims_ver => simprims_ver)
DEFINE LIB_MAP ($LIB_MAP, /simprims_ver => xilinxcorelib_ver)
DEFINE LIB_MAP ($LIB_MAP, + => worklib)

After setting up the libraries, compile and simulate the design:

ncvlog -messages -update $XILINX/verilog/src/glbl.v .v .v
ncelab -messages testfixture_name glbl
ncsim -messages testfixture_name

The -update option of NCVLog enables incremental compilation.

For timing simulation or post-NGDBUILD, the SimPrim-based libraries are used. Specify the following at a command line:

ncvlog -messages -update $XILINX/verilog/src/glbl.v .v time_sim.v
ncelab -messages -autosdf testfixture_name glbl
ncsim -messages testfixture_name

Please see (Xilinx Answer 947) for information on back-annotating the SDF file for timing simulation.

NC-Verilog Simulator Tutorial

Cadence NC-Verilog Simulator is a very good FPGA simulator. The other two famous ones are Synopsys' VCS and Mentor Graphics' Modelsim. Modelsim is implemented based on interpretters, VCS and NC-Verilog are implemented based on Compilers. VCS and NC-Verilog are much faster than Modelsim.

NC-Verilog Simulator provides command line tools and GUI tool.

1. Command line tools tools

  • ncvlog: Compiles Verilog files
  • ncelab: Elaborates the design and generates a simulation snapshot
  • ncsim: Simulates the snapshot
  • ncverilog or irun: Single-step invocation

2. GUI tool

  • nclaunch


4. Single-Step Invocation With ncverilog or irun

Run the NC Verilog simulator with this command:

% ncverilog -f verilog.args

We can also include ncvlog, ncelab, and ncsim options on the ncverilog command line in the form of plus options. There are also some plus options that are specific to the ncverilog command. Running the simulator with the ncverilog command automatically creates everything you need to run the simulator, including all directories, libraries, a cds.lib file, and an hdl.var file. The simulator then translates all applicable Verilog-XL options into options for the NC Verilog simulator and then invokes the parser and compiler (ncvlog), the elaborator (ncelab), and the simulator (ncsim) sequentially to simulate the design.

The following links also give good information:


FPGA Design from Scratch

A good FPGA design tutorial written by Sven Andersson:


Part 1

  • Introduction
  • Ordering the MicroBlaze development kit
  • Installing the Integrated Software Environment (ISE)
  • Running a board demo test
Part 2
  • Design object description
Part 3
  • Setting up the Integrated Software Environment (ISE) design software
  • Running the Integrated Software Environment (ISE) design software
Part 4
  • Adding Verilog source code
  • Generating memories using Coregen
  • Synthesizing the design
  • Simulating the design (Introduction)
Part 5
  • Setting up the simulation environment using Mongoose
Part 6
  • The simulation process
  • Compiling macro libraries
  • Compiling the design
  • Compiling the testbench
  • Elaborating everything
Part 7
  • Testbench description
Part 8
  • Using HAL the HDL analysis and linting tool from Cadence
Part 9
  • Regression testing using Mongoose
Part 10
  • Synthesis using timing constraints (Introduction)
Part 11
  • The Field Programmable Gate Array (FPGA) description
Part 12
  • Adding synthesis constraints
Part 13
  • The MicroBlaze soft processor core
  • Compiling simulation libraries using compedklib
Part 14
  • Putting everything together
  • Installing ISE WebPack 9.1i
  • Installing EDK 9.1i
Part 15
  • Xilinx Platform Studio XPS
  • Software Development Kit SDK
  • Create a new project in XPS
  • Generate a design report file
Part 16
  • Create or import an user peripheral
  • The MHS file
  • XPS project files
  • Xilinx IP center
Part 17
  • Adding the ETC IP
  • Generate the system netlist using platgen
  • What happend during the netlist generation
  • Generate simulation HDL files
Part 18
  • Putting together a system simulation environment
  • The simulation database
  • The cds.lib file
  • Compiling the ETC IP
  • Compiling the block RAM
  • Compiling Verilog wrappers
  • Compiling VHDL wrappers
  • Elaborating the design
  • Warning messages
Part 19
  • Generating a Verilog testbench
Part 20
  • Running our first simulation
  • Adding the DDR SDRAM
  • Suppressing assert messages in IEEE packages
Part 21
  • Debugging the simulation testbench
  • The reset logic
Part 22
  • Using the XPS software development kit (SDK)
  • Software development flow
  • GNU compiler collection (gcc)
  • Running SDK
  • Creating a new C appilcation project
Part 23
  • Simulating program execution in the MicroBlaze processor
  • Verification strategy
  • Verification flow
  • Writing a simple c program
  • Loading the program
  • Running an NCSIM simulation
  • Simulation result
  • Compile and build the program inside SDK
  • Generate assembly code and hex code
  • Make a NCSIM memory load file
  • Running a simulation
Part 24
  • System simulations
  • DDR SDRAM controller
  • LED displays and push buttons
  • OPB GPIO registers
  • Embedded test controller
  • Debugging the On-Chip Peripheral bus
Part 25
  • Implementing the hardware platform
  • User constraints file
  • Setting up our constraints file
  • Specify pin constraints
  • Specify timing constraints
  • The implementation directory
  • Start bitstrem generation
  • Bitstream generation flow
  • Scriptfile to run XFlow
  • Bitstream generation result
  • Configuration of the FPGA
  • Using the platform cable USB
  • ML403 evaluation board
  • ML403 block diagram
  • Installing cable drivers
  • Xilinx JTAG tools on Linux without proprietary kernel modules
  • Setting up the USB cable
  • iMPACT FPGA configuration tool
  • Starting iMPACT
Part 26
  • Using the iMPACT configuration tool
  • Boundary Scan and JTAG configuration
  • IEE standard 1149.1 (JTAG)
  • The identification register
  • Read IDCODE
  • Read the FPGA status register
  • Device configuration
  • Using Xilinx Platform Studio
Part 27
  • Pin assignment closure process
  • PACE Pin and Area Constraint Editor
  • Running PACE
  • Topi the Top Code Generator
  • Topi setup
  • Using Topi to modify the Xilinx user constraints file
  • Xilinx Floorplanner
  • Viewing pin placement
  • Xilinx PlanAhead
Part 28
  • Power calculations
  • XPower
  • Low power consumption
Part 29
  • Hardware setup
  • Software setup
  • Download and execute a simple program
  • Download the bitstream
  • Get program size
  • Running the program
Part 30
  • Running demonstration software applications
  • ML403 Reference Systemson the CD
Part 31
  • Adding a 16x2 character LCD display
  • Set address range
  • Connecting ports
  • The easy way to add a new block
  • Configure the IP block
  • The LCD driver
  • LCD display timing
  • 8-bit write operation
  • Programming sequence
  • Display setup
  • More reading
  • Signal wiring on the ML403 board
  • Adding constraints
  • Generate netlist
  • Generate bitstream
Part 32
  • Writing the "Hello World" program
  • SDK platform settings
  • C program build
  • C header files
  • The GPIO API definitions
  • C program examples
  • Device configuartion in SDK
Part 33
  • Simulating the LCD driver
  • C program
  • Program execution (Waveform plot)
  • Generating the software libraries and BSPs
  • GNU compiler tools
  • Input files
  • Output files
  • Output from SDK build process
  • Display program size
Part 34
  • Program disassembly
  • MicroBlaze software reference guide
  • System memory layout
  • Reset sequence
  • ELF file content
  • Startup files
  • First stage initialization files
  • Second stage initialization files
Part 35
  • Generate simualtion HDL files
  • Simgen
  • Data2MEM memory tool
  • ETC_system_sim.bmm
  • ETC_system_init.vhd
  • ETC_system_tb.vhd
  • Modifying the testbench file
  • Compiling the BRAM initialization file
  • Compiling the testbench
  • Simulating program execution
Part 36
  • The LCD driver (once more)
  • Editing the user constraints file
  • Generate new bitstream
  • Device configuration
  • Application program
  • Displaying "Hello World"
Part 37
  • Debugging our design
  • Xilinx microprocessor debugger and GNU software debugging tools
  • Xilinx microprocessor debugger (XMD)
  • MicroBlaze processor target
  • MicroBlaze MDM hardware setup
  • Debug session
  • Reading registers in MicroBlaze
  • Load program
  • Set breakpoint
  • Remove breakpoint
  • Display breakpoints
  • Start program execution
  • Single step
  • Stop program execution
  • Display program code
  • Getting help
  • Using XMD in Xilinx Platform Studio
Part 38
  • Writing software for our embedded system
  • Writing a software device driver
  • Software development overview
  • Device driver programmer guide
  • Platform specification format reference manual
  • Microprocessor Driver Definition (MDD)
  • Libraries and driver generation
  • Device driver architecture
  • xparameters.h
  • Software driver source code
  • Source code repository
  • Software device drivers used
  • SDK project directory
  • Header source files
Part 39
  • Fixing our software driver
  • etc_v2_1_0.tcl
  • etc_v2_1_0.mdd
  • Makefile
  • xetc_g.c
  • xetc.h
  • xetc_l.h
  • Writing an application program
  • Print statements
  • Printout from program
  • Generate HDL simulation files
  • Generating the BRAM initialization file
  • Running a simulation
Part 40

  • Debugging our hardware design
  • ChipScope Pro
  • Trying out ChipScope Pro
  • ChipScope installation
Part 41

  • Adding an interrupt controller
  • Finding an interrupt controller
  • OPB_INTC
  • Register map
  • Configuring the interrupt controller
  • Making connections
  • Software setup
  • xparameters.h
  • xintc_l.h
  • Generate a software interrupt
  • Generate a hardware interrupt
  • MicroBlaze interrupt handling
  • MicroBlaze interrupt timing
Part 42

  • Adding a timer
  • Connect the interrupt signal
  • OPB Timer/Counter
  • Register address map
  • Library generation
  • Application program
  • Simulation results
Part 43

  • Installing a Linux OS
  • Why using a Linux OS
  • Embedded Linux OS
  • µClinux
  • Finding a linux OS
  • Choosing a Linux OS
  • PetaLinux
Part 44

  • Adding an external memory controller
  • Generate addresses
  • Software platform settings
  • OPB External Memory Controller
Part 45

  • A computer cache
  • Enabling MicroBlaze caches
  • Specify cacheable memory segment
  • Instruction cache operation
  • Data cache operation
  • Xilinx cachelink XCL
  • Adding the MCH_OPB_DDR_SDRAM controller
  • Connect IXCL and DXCL
  • Connecting ports
  • ETC_system.mhs
Part 46

  • Installing and running the Linux OS
  • Disassembly of the Linux kernel
  • Download the Linux kernel

Monday, March 21, 2011

LG Thrill 4G Phone and 3D Video Conference

AT&T today announced it will sell LG Thrill 4G 3D capable smart phone. The LG Thrill 4G boasts a 1GHz dual-core, dual-channel processor with sport of Android 2.2, a 4.3-inch glassless 3D display and 3D camera. It is a branded version of the LG Optimus 3D. The Optimus 3D is the first smartphone to use TI's OMAP 4430 SoC in which IVA 3 hardware accelerators enable full HD 1080p, multi-standard video encode/decode. It was claimed that IVA 3 provides support for high definition stereoscopic 3D encode/decode (OMAP4430: 720p, OMAP4440: 1080p). Brian Klug & Anand Lal Shimpi compared OMAP4430 with NVIDIA's Tegra 2. They said that the 4430 holds a similar advantage over NVIDIA's Tegra 2. They also suggested OMAP4430 may be also better than Samsung's Exynos 4210 and Qualcomm's upcoming MSM8660.
LG Optimus 3D
(Credit: LG)

Last Sunday Nintendo 3DS came to US on sale. It also comes with 3D camera and glassless 3D screen.


I am not sure if h.264 based MVC (Multiview Video Coding) can be supported in these two LG phones although OMAP4430 may support 2D 720p H.264 video encoding and decoding. Nokia opened MVC source codes in 2009. Nokia used the following picture to demonstrate the future 3D screen. Currently MVC is very important for 3D video conferencing. Holographic video conferencing is on the top of the next five in five predicted by IBM.


Since more 3D video contents will be available from 3D smartphone and Nintendo devices, requirement of 3D TV for glassless 3D display will be boosted. Samsung unleashed 55-inch glassless 3D TV in the FPD China Trade Show.


05.jpg


Larger Smartphone Screens Gain due to Video Content Availability

Today the NPD Group published the latest information that shows smartphones with the largest screens (4 inches or larger) have grabbed more and more market shares. Driven largely by sales of high-end Android phones, mobile handsets with screens that are 4 inches or larger now comprise nearly one quarter of all smartphone sales.

"The explosion in Web and video content available for smartphones has caused consumers to rethink their phones' sizes," said Ross Rubin, executive director of industry analysis for NPD. "Larger displays offer a richer media experience, as well as a roomier surface for on-screen keyboards. Handset vendors are continuing to push the envelope of pocket real estate to complement the video capabilities of 4G handsets."

3D Printing and Airbike

According to Wiki, 3D printing is a form of additive manufacturing technology where a three dimensional object is created by laying down successive layers of material. 3D printing is a technology that allows building real objects from 3D drawings. Computer aid design (CAD) can be used to design 3D object via 3D computer graphics. The combination of 3D printing and CAD makes 3D printer to play. 3D printer has been around for many years but its application is limited due to its high cost. Recently thanks to technology progresses in electronics, CAD, and material science, 3D printing is near more reality.

EADS (European Aerospace and Defence Group) has used a process called additive layer manufacturing that combines 3D printing with laser technology to create the Airbike.

airbike1
The prototype on display is completely functional and is as good as any other normal bike that you pick up from the stores, ready for a ride on the road.

Airbike is a good instance to show the promising future of 3D printing which is more environmentally friendly than traditional manufacturing methods.

Followers

Blog Archive

About Me

My photo
HD Multimedia Technology player