Thanks to Terence Eden's note "Connecting Samsung ICS to Ubuntu using MTP". I tried this for Samsung Galaxy Tab 7.0 Plus GT-P6210 which has Android 3.2 with Ubuntu 11.10. Since Android is moving away from USB Mass Storage, we will no longer be able to plug in a USB cable and have our Android show up as a USB disk with Ubuntu. So we need to install MTP tools and set it up for MTP data transfer.
(1) Install the MTP tools.
sudo apt-get install mtp-tools mtpfs
Connect the device to the computer using USB.
To check that MTP is installed and working, run the command
mtp-detect
You should see a spool of text as MTP detects the tablet.
(2) To create the rules which allow Ubuntu to detect the tablet, create a new rule file like so:
sudo emacs /etc/udev/rules.d/51-android.rules
Add in this line of text
SUBSYSTEM=="usb", ATTR{idVendor}=="04e8", ATTR{idProduct}=="6860", MODE="0666"
If you’re using a different device, run this command to get the correct idVendor and idProduct:
mtp-detect | grep idVendor
mtp-detect | grep idProduct
(3) Restart udev so it can pick up the new rule.
sudo service udev restart
(4) Create a directory in your filesystem which you can use to access the tablet.
sudo mkdir /media/Galaxy7
sudo chmod a+rwx /media/Galaxy7
(5) Add ourselves to fuse.
sudo adduser YOURUSERNAME fuse
sudo emacs /etc/fuse.conf
The last line probably reads
#user_allow_other
Remove the “#” so you’re left with:
user_allow_other
Save the file.
(6) Create two commands “android-connect” and “android-disconnect”. When run, these will allow you to connect to your phone, then safely disconnect.
echo "alias android-connect=\"mtpfs -o allow_other /media/Galaxy7\"" >> ~/.bashrc
echo "alias android-disconnect=\"fusermount -u /media/Galaxy7\"" >> ~/.bashrc
source ~/.bashrc
(7) Turn OFF USB debug mode if it is ON
(8) Open your file manager and go to “/media/Galaxy7”, open a terminal, and connect the tablet to the Ubuntu computer via USB and run
android-connect
Without opening file manager and showing “/media/Galaxy7”, it may not work. Different orders also affect the mounting.
Once you’re done, disconnect the device by running
android-disconnect
Monday, March 26, 2012
Friday, March 23, 2012
Samsung Galaxy Tab 7.0 Plus GT-P6210 Custom ROM
bdds13 at xda-developers developed a custom ROM, OMGBBQROM, for Samsung Galaxy Tab 7.0 Plus GT-P6210. The rom is based samsung's LA3 firmware with following features;
- build.prop tweaks (improved touch screen response, enabled launcher hardware acceleration, experimental dalvik heapsize, possible battery saving tweaks, etc).
- zip-aligned apps
- removed bloatware (mostly samsung's apps such as their music player and store)
- de-odexed
- root
- Go Launcher HD for tablet as default launcher (removed the crappy touchwiz-honeycomb launcher)
- Backup the original or working system using ClockworkMod Recovery
- Download the OMGBBQROM Final to your PC.
- Prepare a MicroSD Card for your tablet’s external SD card.
- Connect your tablet to your PC. Copy the zip file to the external SD card.
- Power off your tablet.
- Reboot the device into recovery mode by holding the Volume Up button along with the Power button.
- In recovery mode, select the option to install update from external storage.
- Locate the zip file in your external storage. Select the file by pressing the Power button.
- When the rooting process finishes, reboot your device.
Thursday, March 22, 2012
Samsung Galaxy Tab 7.0 Plus GT-P6210 ClockworkMod Recovery and Root
I tried the method developed by garyd9 at xda-developers and it works for my GT-P6210:
- Install the latest version of Samsung Kies.
- Download the p6210_CWMR_20120107.zip to your PC.
- Prepare a MicroSD Card for your tablet’s external SD card.
- Connect your tablet to your PC. Copy the zip file to the external SD card.
- Power off your tablet.
- Reboot the device into recovery mode by holding the Volume Up button along with the Power button.
- In recovery mode, select the option to install update from external storage.
- Locate the zip file in your external storage. Select the file by pressing the Power button.
- When the rooting process finishes, reboot your device.
- In Android Market or Google Play Store and search for the SuperUser app, BusyBox, and Root Checker Basic.
- Install the apps and run SuperUser and Root Checker Basic.
- Root Checker Basic's "Verify Root Access" will report "This device has root access!"
- Reboot to the device into recovery mode and you will see the ClockworkMod menu.
Wednesday, March 21, 2012
ARCHOS 101 G9 Turbo and Rooting
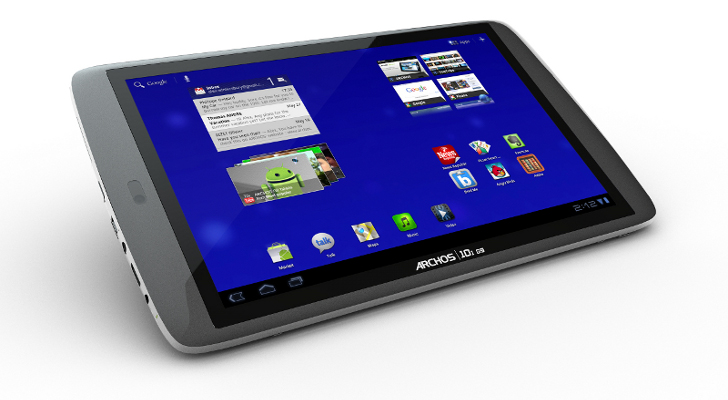
How to root?
PaulOBrien developed a rooting tool for Archos 80 G9 and I tried this tool for ARCHOS 101 G9 Turbo. It also works. The procedure is the same as the original one:
- Ensure you can see your device in ADB - do 'adb devices' (or 'adb-windows devices' / 'adb-linux devices' / 'adb-mac devices' as appropriate). If you do not and you are using Windows, check device manager to ensure that you have any required drivers installed. If you still can't see your device or are not using Windows, edit adb_usb.ini (which can be found at 'C:\Users\%USERPROFILE%\.android\adb_usb.ini' on Windows and '~/.android/adb_usb.ini' on Mac / Linux) and add the line ' 0x0e79' before restarting adb ('adb kill-server').
- Download 'Step 1' of the root process - DOWNLOAD - MD5: 6645915d4f252888a9dc0303519b15a6
- Download 'Step 2' of the root process - DOWNLOAD - MD5: dc16d0c53bc420be4b898481e31fdc2a
- With the 2 files in your current directory and your device connected issue the following commands (waiting for the device to reboot after the reboot commands):
adb push 1 /data/local/
adb push 2 /data/local/
adb shell chmod 0755 /data/local/1
adb shell chmod 0755 /data/local/2
adb shell /data/local/1
adb reboot
adb shell /data/local/2
adb reboot
- And that's it! Now when you connect via adb shell you should see the '#' prompt which means you have a root shell.
Samsung Galaxy Tab 7.0 Plus GT-P6210 and Rooting

Samsung Galaxy Tab 7.0 Plus has
- Android 3.2 Honeycomb with TouchWiz on top
- 7″ IPS LCD display of 1024×600 resolution
- 1.2 GHz Dual core Exynos Processor, 1 GB RAM
- 3 MP rear camera with LED Flash, can do HD (720p) recording, 2 MP camera on the front
This tablet runs on the same Exynos chipset as the Galaxy S II (excluding the T-Mobile version), and it adds in all the hardware-acceleration-enhanced goodness of Honeycomb - turbocharging Samsung's already blisteringly fast dual-core processor. Samsung announced Exynos 5-series with a quad-core GPU in last November.
- Install the latest version of Samsung Kies.
- Download the rooting file root.zip to your PC.
- Prepare a MicroSD Card for your tablet’s external SD card.
- Connect your tablet to your PC. Copy the root.zip file to the external SD card.
- Power off your tablet.
- Reboot the device into recovery mode by holding the Volume Up button along with the Power button.
- In recovery mode, select the option to install update from external storage.
- Locate the root.zip file in your external storage. Select the file by pressing the Power button.
- When the rooting process finishes, reboot your device.
- In Android Market or Google Play Store and search for the SuperUser app, BusyBox, and Root Checker Basic.
- Install the apps and run SuperUser and Root Checker Basic.
- Root Checker Basic's "Verify Root Access" will report "This device has root access!"
Tuesday, March 13, 2012
One-click Recovery + Root for Le Pan II on Android 3.2.1

Thanks to dbaybay for providing detail instructions and tools to root Le Pan II TC-979 which has Qualcomm APQ8060 (1.2GHz). The procedures include two steps:
Install ADB Package for the Le Pan II, Windows Users
- Install JDK 7 if it is not installed in your machine
- Download the JDK
- Install the JDK
- Download "lepanlife" and unzip the folder "lepanlife"
- Place the ".android" folder in your "home" folder (If you click start and then on your username in Windows 7 or Vista, or "C:\Documents and Settings\your username" in Windows XP, this is where it goes. In the root folder where desktop, downloads, my pictures, etc.. is.)
- Once you've taken the ".android" folder out, place the whole, unzipped "lepanlife" folder in the root on your c:\ drive. So it should look like: c:\lepanlife
- Start your Le Pan II and turn on USB Debugging (Settings > Applications > Development Options > USB Debugging)
- In android_winusb.inf under c:\lepanlife\drivers, if
%CompositeAdbInterface% = USB_Install, USB\VID_16d5&PID_8006&MI_01
should be changed to
%CompositeAdbInterface% = USB_Install, USB\VID_16d5&PID_8005&MI_01
- that change from PID_8006 to PID_8005 under CompositeAdbInterface.
- Open your device manager of Windows and plug in the USB cable of Le Pan II to the Windows machine
- Right click on "ANYDATA HSUSB DEVICE" and click update drivers. Choose the "Let me choose drivers" option and then click the "have disk" option. Navigate to the "c:\lepanlife\drivers" and click on the "android_winusb" file and then click ok. Install the driver and restart your computer
- When your computer restarts, open a new command prompt and type in: cd c:\lepanlife\adb
- And then type in: adb devices
- You should see several numbers under Devices Connected. This is the serial number to your device and you're all set to start us ADB!
- Download the Dbaybay's One-Click Root Package and extract contents.
- Run Part-One.bat (this will reboot your tab to fastboot, flash CWM, reboot normally & then reboot you to recovery)
- Once the above is done and you are in CWM, close the Part-One.bat Command Prompt!
- Run Part-Two.bat (this will install Superuser.apk, su binaries & busybox binaries)
I tested with the HTK75.users.v114 build with a Windows XP host machine and obtained a rooted Le Pan II.
Monday, March 12, 2012
Viewsonic G Tablet Android ICS Rooting
Thanks to the excellent work from Team DRH (Dirty Reset Hole), Android ICS (Ice Cream Sandwich) works for Viewsonic G Tablet. It is a huge jump for the G-Tablet community because along with the building of ICS specifically for SMBA1002 (G-Tablet), the Linux kernel backbone had to be reworked from the ground up.

 These directions are David Jackson’s, and they worked fine for me when I flashed ICS.
Install ClockWorkMod
Clear Data
Install ClockWorkMod
- Download the CWM file (CWM5504.1.2internal.zip) and save it on your PC.
- Unzip the file. Inside the archive, you should find a FOLDER called recovery, and a FILE called update.zip.
- Use your USB cable to connect your G-Tablet to your computer.
- After it connects you should get a popup that asks what you want to do with the device – click open to view files.
- Drag the recovery folder and the update.zip file to the root of the INTERNAL SDCard, (the folder that you just opened).
- Turn off your G-Tablet.
- Get into recovery mode by pressing the power and volume “+” button at the same time. When you see the words “recovery key detected”, you can let go of the buttons.
- Let CWM install, and if you see “Installing package” and it stays like that, leave it for a while and then press “reboot system” and it should work fine.
- Walla – you now have ClockWorkMod 5.5.0.4 on your G-Tablet, and you can always access it by holding the power and volume “+” buttons during power on.
Clear Data
- On the Main CWM Menu, select ”Wipe data/factory reset” & press home to execute
- Select “Yes — delete all user data”
- Select “Wipe cache partition“
- Select “Yes – Wipe Cache”
- Select “advanced” and then “Partition SD Card” & execute (Answer 2048 to the first and 0 to the second option.)
- Wait until it is finished – this step takes a couple minutes. Press the back key to return to the main CWM menu
- Connect the USB cable between the GTab and your computer
- Select “mount USB storage”
- Download the ROM file (TeamDRH-ICS-Preview-2B.zip) and the GApps file (3DGtaB_GAppZ_v7B.zip) (Updated 03/01/12)
- On your computer, find the ROM file that you downloaded
- Copy the ROM file and the GApps file (both still in ZIP format) to the root of the internal memory (14gig) of the GTab.
- In ClockworkMod, select “Unmount USB storage” & execute
- Remove the USB cable from the GTab.
- Press the back key to return to the main CWM menu
- Select “install zip from sdcard” & execute.
- Select “choose zip from sdcard” and press home.
- Use the volume controls to locate & select the ROM zipped file (TeamDRH-ICS-Preview-2B.zip) that you copied to the root, and install it.
- Select “Yes”
- When the GTab finishes with the installation, it will report “Install from sdcard complete.”
- Press the back key to return to the main CWM menu
- Select “install zip from sdcard” & execute.
- Select “choose zip from sdcard” and press home.
- Use the volume controls to locate & select the GAPPS zip file (3DGtaB_GAppZ_v7B.zip) that you copied to the root & install it.
- Select “Yes”
- When the GTab finishes with the installation, it will report “Install from sdcard complete.”
Unfortunately Google Apps do not work very well for me. Lots of crashes occurred including new Google Play Store.
Sunday, March 11, 2012
Xilinx Zynq ARM/FPGA SoC
Xilinx Zynq is a big FPGA with a dual-core ARM Cortex-A9 with a big FPGA around it, as a programmable system-on-chip; an alternative to an ASIC or SoC that doesn’t require exotic EDA tools and hyper-expensive production. It contains:

Among Zynq-7000 EPP devices, Z-7010 and Z-7020 are based on the Artix™-7 FPGA fabric, and Z-7030 and Z-7045 are based on the Kintex™-7 FPGA fabric.
For as little as $15, it could take the place of a custom-designed SoC, but without the million-dollar development effort.
Xilinx is seeing an addressable market for Zynq of more than $12.7 billion by 2014, according to Larry Getman, vice president of marketing for processing platforms at Xilinx, including intelligent video.
- Dual ARM Cortex™-A9 MPCore
- Up to 800MHz
- Enhanced with NEON Extension and Single & Double Precision Floating point unit
- 32kB Instruction & 32kB Data L1 Cache
- Unified 512kB L2 Cache
- 256kB on-chip Memory
- DDR3, DDR2 and LPDDR2 Dynamic Memory Controller
- 2x QSPI, NAND Flash and NOR Flash Memory Controller
- 2x USB2.0 (OTG), 2x GbE, 2x CAN2,0B 2x SD/SDIO, 2x UART, 2x SPI, 2x I2C, 4x 32b GPIO
- AES & SHA 256b encryption engine for secure boot and secure configuration
- Dual 12bit 1Msps Analog-to-Digital converter
- Up to 17 Differential Inputs
- Advanced Low Power 28nm Programmable Logic:
- 28k to 350k Logic Cells (approximately 430k to 5.2M of equivalent ASIC Gates)
- 240KB to 2180KB of Extensible Block RAM
- 80 to 900 18x25 DSP Slices (58 to 1080 GMACS peak DSP performance)
- PCI Express® Gen2x8 (in largest devices)
- 154 to 404 User IOs (Multiplexed + SelectIO™)
- 4 to 16 12.5Gbps Transceivers (in largest devices)
Among Zynq-7000 EPP devices, Z-7010 and Z-7020 are based on the Artix™-7 FPGA fabric, and Z-7030 and Z-7045 are based on the Kintex™-7 FPGA fabric.
For as little as $15, it could take the place of a custom-designed SoC, but without the million-dollar development effort.
Xilinx is seeing an addressable market for Zynq of more than $12.7 billion by 2014, according to Larry Getman, vice president of marketing for processing platforms at Xilinx, including intelligent video.
Key Documents
Friday, March 9, 2012
ZiiLABS ZMS-40 for Android Tablets to Support HEVC/H.265

ZiiLABS ZMS-40 has Quad 1.5 GHz ARM Cortex-A9 MP Cores and 96x fully-programmable StemCell Media Processing cores, and supports wide range of accelerated video codecs including H.264, VC1, WebM (VP8) and HEVC, including ultra-high-resolution H.264 HP decoding of up to 3840×1080 for true 1080p 3D stereo, a rich and interactive desktop browsing experience, 2560×1600 (WQXGA) display resolution support, higher-quality video encoding and immersive OpenGL ES graphics and future support for High Efficiency Video Coding (HEVC).
The up-and-coming HEVC standard (also known as H.265), besides other qualitative benefits, can also increase data compression ratio by up to 2X as compared to H.264. These technology wizardries are achieved by requiring many more times the computational complexity. HEVC claims to target the next generation Hi-Def TV market which can support scalable resolutions from 320×240 to 1080p with improved picture quality in terms of noise level, color and dynamic range, and all the way up to an incredible resolution of 7680×4320. Being fully programmable and with their massive parallelism, the 96 cores of StemCell Media processors can easily handle the onerous computational requirements of this new CODEC and support higher resolutions that are beyond today’s display systems.

- ZiiPhoto for intelligent photo browsing, 3D slide show and special photo effects,
- ZiiCamera for real-time preview and capturing of photos with 3D effects; live ultra high resolution 40 megapixel Panoramic photo capture in one sweep; and high dynamic range images,
- ZiiVideo for advanced video playback including 1080p WebM (VP8) support and trick modes (such as reverse play, frame-by-frame advance and reverse, multi-speed play and more), and skip to any part of a movie by browsing a timeline with thumbnails,
- Creative Sound Blaster X-Fi’s Crystalizer and CMSS-3D audio effects.
The ZiiLABS ZMS-40 is sampling to select customers based on the JAGUAR tablets running Android 4.0 (Ice Cream Sandwich).
Thursday, March 8, 2012
Comparison between iPAD 3 and Galaxy Note 10.1
Display
|
9.7
inch, Retina, 1536x2048 pixel, 241dpi
|
10.1
inch, S-Pen, PLS TFT capacitive, 1280x800, 149 dpi
|
Chip
|
dual core 1GHz
processor with 512MB ~1GB of RAM, A5X chipset with a quad core graphics
processing unit
|
dual core 1.4GHz
processor with 1GB of RAM
|
Camera
|
3.15-megapixel
primary at 2048x1536 pixels, 5-megapixel backside illuminated sensor,
5-element lens, IR filter, and ISP built in, 1080p video
|
5-megapixel
backlight-illuminated sensor (BSI) at 2592x1944 pixels, 1080p video recording
and a 2-megapixel secondary
|
Storage
|
16G, 32G, 64G
|
16, 32 and 64G, plus micro
SD slot up to 32G
|
Connectivity
|
4G
LTE
|
3G
|
OS
|
iOS 5.1
|
Android 4.0 ICS
|
Battery
|
14,000 mAh
|
Li-Ion
7000 mAh
|


Although the new iPAD 3 display is said to have a 44 per cent greater colour saturation compared to the old iPad 2/iPad display, but its color gamut still does not reach 50% of Adobe RGB gamut?
Wednesday, March 7, 2012
HEVC / H.265 Text Specification Draft 6, RTP Payload and HM-6.0rc1
High Efficiency Video Coding (HEVC) or H.265 under development by ISO / IEC Moving Pictures Experts Group (MPEG) and the ITU-T Video Coding Experts Group (VCEG), could reduce between a 25-50% the H.264 bitrate, as demonstrated by Qualcomm with a preliminary version of H.265 or HEVC video on an Android tablet powered by a current-generation Qualcomm Snapdragon S4 dual-core processor running at 1.5GHz.
The latest HEVC or H.265 text specification draft 6 can be downloaded from the link. It includes a single profile, Main, which is similar to the Progressive High profile in H.264 AVC. The draft standard contains provisions for future extensions similar to Scalable Video Coding and Multiview Video Coding defined in H.264 AVC.
The corresponding RTP Payload Format draft for HEVC or H.265 defines an RTP payload format which allows for packetization of one or more Network Abstraction Layer (NAL) units in each RTP packet payload, as well as fragmentation of a NAL unit into multiple RTP packets. Furthermore, it supports transmission of an HEVC stream over a single as well as multiple RTP flows. The payload format has wide applicability in videoconferencing, Internet video streaming, and high bit-rate entertainment-quality video, among others. It is similar to the H.264 Payload Format, referred to be RFC3984.
The latest HEVC reference software version is HM-6.0rc1.
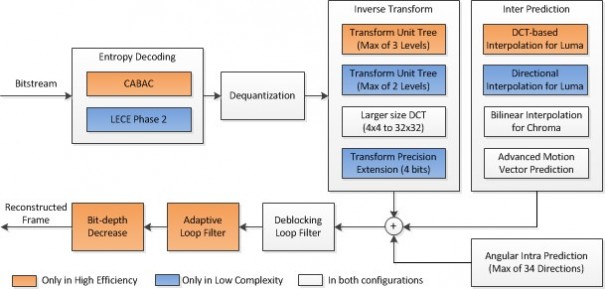
H.265 Decoding Framework
The latest HEVC or H.265 text specification draft 6 can be downloaded from the link. It includes a single profile, Main, which is similar to the Progressive High profile in H.264 AVC. The draft standard contains provisions for future extensions similar to Scalable Video Coding and Multiview Video Coding defined in H.264 AVC.
The corresponding RTP Payload Format draft for HEVC or H.265 defines an RTP payload format which allows for packetization of one or more Network Abstraction Layer (NAL) units in each RTP packet payload, as well as fragmentation of a NAL unit into multiple RTP packets. Furthermore, it supports transmission of an HEVC stream over a single as well as multiple RTP flows. The payload format has wide applicability in videoconferencing, Internet video streaming, and high bit-rate entertainment-quality video, among others. It is similar to the H.264 Payload Format, referred to be RFC3984.
The latest HEVC reference software version is HM-6.0rc1.
iPAD 3 Records 1080p Video Using Quad-core Processor With 2048x1536 Retina Display
The new iPad announced today comes with rich multimedia capabilities:

- Retina display with a resolution of 2048 x 1536, which includes 3.1 million pixels;
- The 5MP iSight camera technology from the iPhone 4S;
- 1080p video recording;
- A5X quad-core processor;
- Siri from the iPhone 4S, the voice recognition to the iPad, allowing voice dictation of emails;
The prices for the iPad remain unchanged at $499 for the 16GB with wifi, $599 for 32GB wifi and $699 for the 64GB model with wifi. Models with 4G are priced at $629/$729/$829 for 16GB/32GB/64GB configurations.
IDC Releases First Worldwide Big Data Technology and Services Market Forecast
IDC predicted that Big Data market will be big and grow from $3.2 billion in 2010 to $16.9 billion in 2015. This represents a compound annual growth rate (CAGR) of 40% or about 7 times that of the overall information and communications technology (ICT) market.
According to a study conducted by MGI (McKinsey Global Institute), if US healthcare were to use big data creatively and effectively to drive efficiency and quality, the sector could create more than $300 billion in value every year. Two-thirds of that would be in the form of reducing US healthcare expenditure by about 8 percent. In the developed economies of Europe, government administrators could save more than €100 billion ($149 billion) in operational efficiency improvements alone by using big data, not including using big data to reduce fraud and errors and boost the collection of tax revenues. And users of services enabled by personal-location data could capture $600 billion in consumer surplus.
"The Big Data market is expanding rapidly as large IT companies and startups vie for customers and market share," said Dan Vesset, program vice president, Business Analytics Solutions at IDC. "For technology buyers, opportunities exist to use Big Data technology to improve operational efficiency and to drive innovation. Use cases are already present across industries and geographic regions.
"There are also Big Data opportunities for both large IT vendors and start ups," Vesset continued. "Major IT vendors are offering both database solutions and configurations supporting Big Data by evolving their own products as well as by acquisition. At the same time, more than half a billion dollars in venture capital has been invested in new Big Data technology."
Additional findings from IDC's study include the following:
See the IDC "Worldwide Big Data Technology and Services 2012–2015 Forecast" report for detail.
According to a study conducted by MGI (McKinsey Global Institute), if US healthcare were to use big data creatively and effectively to drive efficiency and quality, the sector could create more than $300 billion in value every year. Two-thirds of that would be in the form of reducing US healthcare expenditure by about 8 percent. In the developed economies of Europe, government administrators could save more than €100 billion ($149 billion) in operational efficiency improvements alone by using big data, not including using big data to reduce fraud and errors and boost the collection of tax revenues. And users of services enabled by personal-location data could capture $600 billion in consumer surplus.
"The Big Data market is expanding rapidly as large IT companies and startups vie for customers and market share," said Dan Vesset, program vice president, Business Analytics Solutions at IDC. "For technology buyers, opportunities exist to use Big Data technology to improve operational efficiency and to drive innovation. Use cases are already present across industries and geographic regions.
"There are also Big Data opportunities for both large IT vendors and start ups," Vesset continued. "Major IT vendors are offering both database solutions and configurations supporting Big Data by evolving their own products as well as by acquisition. At the same time, more than half a billion dollars in venture capital has been invested in new Big Data technology."
Additional findings from IDC's study include the following:
- While the five-year CAGR for the worldwide market is expected to be nearly 40%, the growth of individual segments varies from 27.3% for servers and 34.2% for software to 61.4% for storage.
- The growth in appliances, Cloud, and outsourcing deals for Big Data technology will likely mean that over time end users will pay increasingly less attention to technology capabilities and will focus instead on the business value arguments. System performance, availability, security, and manageability will all matter greatly. However, how they are achieved will be less of a point for differentiation among vendors.
- Today there is a shortage of trained Big Data technology experts, in addition to a shortage of analytics experts. This labor supply constraint will act as an inhibitor of adoption and use of Big Data technologies, and it will also encourage vendors to deliver Big Data technologies as cloud-based solutions.
See the IDC "Worldwide Big Data Technology and Services 2012–2015 Forecast" report for detail.
Monday, March 5, 2012
Nokia Unveils 41-megapixel 808 PureView Smartphone
At Mobile World Congress 2012, Nokia ushered in a new smartphone imaging with the Nokia 808 PureView. This is the first smartphone to feature Nokia PureView imaging technologies, bringing together high resolution sensors, exclusive Carl Zeiss optics and Nokia developed algorithms, which will support new high-end imaging experiences for future Nokia products.

The Nokia 808 PureView features a large, high-resolution 41 megapixel sensor with high-performance Carl Zeiss optics and new pixel oversampling technology. At standard resolutions (2/3, 5 and 8 megapixels) this means the ability to zoom without loss of clarity and capture seven pixels of information, condensing into one pixel for the sharpest images imaginable. At high-resolution (38 megapixel maximum, 7,152 by 5,368 pixels) it means the ability to capture an image, then zoom, reframe, crop and resize afterwards to expose previously unseen levels of details. The default mode records 5-megapixel images by condensing seven pixels into one, but you can turn off that default and get 38-megapixel pictures if you feel you can handle the file size. The 5-megapixel mode offers dramatically reduced low light noise and improved image quality because it's oversampling, though, and that's the mode Nokia thinks most people will be using most often.
In addition to superior still imaging technology, the Nokia 808 PureView, also includes full HD 1080p video recording and playback with 4X lossless zoom and the world's first use of Nokia Rich Recording. Rich Recording enables audio recording at CD-like levels of quality, previously only possible with external microphones. The Nokia 808 PureView also features exclusive Dolby Headphone technology, transforming stereo content into a personal surround sound experience over any headphones and Dolby Digital Plus for 5.1 channel surround sound playback.

Video codecs and formats
The Nokia 808 PureView features a large, high-resolution 41 megapixel sensor with high-performance Carl Zeiss optics and new pixel oversampling technology. At standard resolutions (2/3, 5 and 8 megapixels) this means the ability to zoom without loss of clarity and capture seven pixels of information, condensing into one pixel for the sharpest images imaginable. At high-resolution (38 megapixel maximum, 7,152 by 5,368 pixels) it means the ability to capture an image, then zoom, reframe, crop and resize afterwards to expose previously unseen levels of details. The default mode records 5-megapixel images by condensing seven pixels into one, but you can turn off that default and get 38-megapixel pictures if you feel you can handle the file size. The 5-megapixel mode offers dramatically reduced low light noise and improved image quality because it's oversampling, though, and that's the mode Nokia thinks most people will be using most often.
In addition to superior still imaging technology, the Nokia 808 PureView, also includes full HD 1080p video recording and playback with 4X lossless zoom and the world's first use of Nokia Rich Recording. Rich Recording enables audio recording at CD-like levels of quality, previously only possible with external microphones. The Nokia 808 PureView also features exclusive Dolby Headphone technology, transforming stereo content into a personal surround sound experience over any headphones and Dolby Digital Plus for 5.1 channel surround sound playback.
Nokia 808 PureView
Video codecs and formats
- H.264 (base profile, main profile, high profile), MPEG-4, VC-1, Sorenson Spark, Real video 10
- Streaming: H.264, Flash Lite 4 (Flash 10 compatibility for video), On2 VP6, Sorenson Spark
Sunday, March 4, 2012
Qualcomm Demonstrates HEVC / H.265 Video Codec on Android Tablet
At the Mobile World Congress 2012 show in Barcelona, Qualcomm demonstrated a preliminary version of H.265 or HEVC video on an Android tablet powered by a current-generation Qualcomm Snapdragon S4 dual-core processor running at 1.5GHz.
H.264 is today's leader when it comes to mainstream video encoding technologies, but it will have to share the stage in 2013 with a successor called H.265 that can squeeze a video into nearly half the file size. H.264, also known as the Advanced Video Codec (AVC), defines how a video can be compressed for reduced storage requirements and--very importantly given the online video explosion--for streaming across networks. H.265, also called High Efficiency Video Codec (HEVC), uses new techniques to compress video even more.
The H.265 codec is likely to gain widespread support, but it and H.264 competes with a royalty-free alternative called VP8 that Google has released. Qualcomm competitor Nvidia has built VP8 decoding support into its newer Tegra 3 chips alongside H.264 support.
Qualcomm is bullish about the codec. If a given network capacity can sustain higher-quality video, that means mobile devices are better for entertainment. And because H.265's efficiencies come at the cost of a significantly higher need for processing power, mobile device makers have a new reason to buy the latest chips.
Qualcomm showed a software based encoded demo video, showing race cars peeling around a track, played at a bit rate of 610 kilobits per second on H.265 compared to 1,183Kbps for H.264. The size of the video file itself was 3.10MB for H.265 vs 6.01MB for H.264. Each video had 800x480-pixel resolution. Qualcomm will build H.265 encoding into its chips, though it is not promised when or in which processor model.
See more at a CNET report.
Thursday, March 1, 2012
One-click Root for Asus Transformer Prime on Android 4.0.3 (ICS 9.4.2.15 Firmware)
(1) Requirements:
- Download tools from Windows or Linux.
- Make sure that USB Debugging is enabled on the tablet. This is possible by going to Settings > Developer Options
- Make sure tablet is at least 70% charged
(2) Windows Procedures
- Unzip the contents to a new folder
- Kill Splashtop and Asus Sync and connect the tablet to the PC via the USB cable
- Install all the drivers located in the new folder including the adb driver
- Run PrimeTime.exe for windows users. A command prompt line will show up
(3) Linux Procedures
- Unzip the contents to a new folder
- chmod a+x for all files
- run the script primetime.sh under the root user
Type 1 to begin the rooting process.
Once done, install OTA ROOT KEEPER from Android App market.
With the help of OTA Root Keeper, you’ll have a backup of your device’s root and will allow your root to survive OTAs.
Subscribe to:
Posts (Atom)