Tuesday, August 2, 2016
Add Pre-compiled aar library to Android Studio 2.1
Just add the aar-Files as Modules: File -> New -> New Module -> Import .AAR Package.

Monday, March 28, 2016
Nexus 9 Marshmallow update from Android LMY48M
Recently I wanted to update my Nexus Android OS version 5.1.1 LMY48M to Android N. I downloaded a system image from Google website and could not update since I got unlock denying error when using "fastboot oem unlock" or "fastboot flashing unlock". So I followed the instructions provided by dsclee1 to update LMY48M to Android N.
1. Reboot into HBOOT with "adb reboot bootloader"
2. Press Volume Down to highlight Recovery, then press the Power Button to enter it.
3. Wait until the Google logo goes away, and you should see a picture of an Android laying on it’s back. Hold down the Power Button + Volume Up (very important to hold Power FIRST)
4. Download Nexus 9 (Wi-Fi) LMY48T from LMY48M
5. If you don’t have it already, download and install “Minimal ADB and Fastboot”: when it’s installed let it run straight away, and leave the command prompt open you’ll need it in a min
6. Copy the OTA update file you downloaded to the folder that Minimal ADB was installed in (usually C:\Program Files (x86)\Minimal ADB and Fastboot\)
7. Back on your device use Volume down to get to “Wipe Cache Partition”, and press the Power Button to activate it. If you want to be really sure this will work you should do a “Wipe data/factory reset” too, but be aware you will definitely lose your data.
8. Use Volume up to go to “Apply update from ADB”, and press the Power Button to enter it
9. On your PC, in the Minimal ADB Command Prompt (that you should still have open from earlier) enter “adb sideload {NAMEOFOTAFILE}”
10. Reboot
11. Go to the Settings->About->Software Update, and the device will update it self to Android N 6.0.1.
Or in the 4 step, directly update it from MRA58K from LMY48M if we can find the OTA firmware but I did not find it.
1. Reboot into HBOOT with "adb reboot bootloader"
2. Press Volume Down to highlight Recovery, then press the Power Button to enter it.
3. Wait until the Google logo goes away, and you should see a picture of an Android laying on it’s back. Hold down the Power Button + Volume Up (very important to hold Power FIRST)
4. Download Nexus 9 (Wi-Fi) LMY48T from LMY48M
5. If you don’t have it already, download and install “Minimal ADB and Fastboot”: when it’s installed let it run straight away, and leave the command prompt open you’ll need it in a min
6. Copy the OTA update file you downloaded to the folder that Minimal ADB was installed in (usually C:\Program Files (x86)\Minimal ADB and Fastboot\)
7. Back on your device use Volume down to get to “Wipe Cache Partition”, and press the Power Button to activate it. If you want to be really sure this will work you should do a “Wipe data/factory reset” too, but be aware you will definitely lose your data.
8. Use Volume up to go to “Apply update from ADB”, and press the Power Button to enter it
9. On your PC, in the Minimal ADB Command Prompt (that you should still have open from earlier) enter “adb sideload {NAMEOFOTAFILE}”
10. Reboot
11. Go to the Settings->About->Software Update, and the device will update it self to Android N 6.0.1.
Or in the 4 step, directly update it from MRA58K from LMY48M if we can find the OTA firmware but I did not find it.
Tuesday, March 8, 2016
Wednesday, March 2, 2016
Ubuntu 12.04 (Precise Pangolin) on Beagleboard XM / Pandaboard
Downloading Ubuntu
Download the compressed image from http://cdimage.ubuntu.com/releases/12.04/
- For BeagleBoard XM, use ubuntu-12.04-preinstalled-desktop-armhf+omap.img.gz
- For Pandaboard, use ubuntu-12.04-preinstalled-desktop-armhf+omap4.img.gz
Writing the image
You should write the raw image to a blank SD card. Make sure you're using at least a 4G SD card (desktop image is 2G uncompressed).
Linux
Steps:
- Place the SD card at your host computer.
- Make sure the SD card is not mounted (just umount it if needed)
- Identify the correct raw device name (like /dev/sde - not /dev/sde1)
- Run the following command to write it:
zcat ./ubuntu-12.04-preinstalled-desktop-armhf+omap.img.gz |sudo dd bs=4M of=/dev/sde ; sudo sync
 Some people have reported issues with this method. If this doesn't work, try the following commands:
- gunzip ubuntu-12.04-preinstalled-desktop-armhf+omap.img.gz
- sudo dd bs=4M if=ubuntu-12.04-preinstalled-desktop-armhf+omap.img of=/dev/sde
- sudo sync
MAC (OSX 10.x)
Download the image and extract it with the system archive utility, you should get a .img file if the disk is mounted disk1.. disk2.. not - disk0, unmount it with the following code.
sudo diskutil unmountDisk disk1
Then use the following code to write the image to disk1 (not - disk1s1..)
sudo dd bs=4m if=ubuntu-12.04-preinstalled-server-armhf+omap.img of=/dev/disk1
If you get any errors trying to run the following code then try reinserting the SD card and trying again after unmounting the disk, or try formatting it first with DiskUtilities
Windows (XP/Vista/7)
Download the image and extract it using WinZip or some other archive utility. Then use Win32ImageWriter to write the unzipped img file to your flash device.

This is a Windows program for saving and restoring images from removable drives (USB drives, SD Memory cards, etc). It can be used to write boot images (i.e. ubuntu-12.04-preinstalled-desktop-armhf+omap.img) to a SD Flash device or USB flash device, making it bootable.
Win32DiskImager supports writing an ISO image to USB too, which is very valuable right now with the Ubuntu releases 14.04 LTS - 15.10, because there are problems with the Ubuntu Startup Disk Creator.
The program and source code can be downloaded from here.
This tutorial subpage with screenshots illustrates how to create a USB boot drive from a Lubuntu ISO file. It works in the same way for all current Ubuntu family iso files including the Ubuntu mini.iso version 14.04 LTS (but mini.iso version 12.04 LTS is the only exception).
Booting the image
On Pandaboard and BeagleXM just switch on the board with the SD card inserted.
Thursday, December 10, 2015
Avoiding Duplicate File / Symbol Issues Linking 3rd Party Library on iOS
1. File Name Conflicts or Same Duplicated Symbols
2. Not Many Symbols Conflicts
Michael Tyson mentioned to use the preprocessor to rename the symbols automatically during the build phase.
This is done by adding a series of -DOldSymbol=NewSymbol flags to the ‘Other C Flags’ build setting – like -DTPCircularBuffer=ABCircularBuffer, for instance in XCode.
3. Many Symbols Conflicts
We may need prefix other static libraries to use a two-pass compilation process:
$ lipo -info libTest.a
Architectures in the fat file: libTest.a are: armv7 i386
Then to extract just armv7, for example:
$ lipo -extract_family armv7 -output libTest-armv7.a libTest.a
$ mkdir armv7
$ cd armv7
$ ar -x ../libTest-armv7.a
You can then extract the same architecture from the other library into the same directory, change file names, and then recombine them like so:
$ libtool -static -o ../libTest-armv7.a *.o
And then finally, after you've done this with each architecture, you can combine them again with lipo:
$ cd ..
$ lipo -create -output lib.a libTest-armv7.a libTest-i386.a
This should get rid of any duplicate symbols if we can assume the 3rd party libraries are the same between two libraries, when combining the two libraries into one. If you want to keep them separate, or just delete the duplicate from one library, you can modify the process accordingly.
2. Not Many Symbols Conflicts
Michael Tyson mentioned to use the preprocessor to rename the symbols automatically during the build phase.
This is done by adding a series of -DOldSymbol=NewSymbol flags to the ‘Other C Flags’ build setting – like -DTPCircularBuffer=ABCircularBuffer, for instance in XCode.
3. Many Symbols Conflicts
We may need prefix other static libraries to use a two-pass compilation process:
- The first pass builds the dependent project and runs
nmto dump all symbols into a header file. - The second pass builds the dependent project again, but this time with the generated prefix header file imported in the precompiled header. This prefix header must be used anywhere you reference symbols from the dependency in your framework in order to properly refer to the renamed symbols.
$ nm lib.a | grep TEST
You will get a list of all symbols of TEST. Then use a script to add a prefix to all of the symbols in final .a file so that e.g. TEST becomes NEW_TEST under a #ifdef. Your version of dependency is not connected to version used by developer and no collisions occurs.
Wednesday, December 9, 2015
XCode 7 Link Errors for Simulator "Building for iOS simulator, but linking in object file built for OSX, for architecture ..."
Recently I encountered XCode 7 link error when compiling iOS simulator. The error was "Building for iOS simulator, but linking in object file built for OSX, for architecture i386". After adding "-O2 -m32 -miphoneos-version-min=5.0" to the compiler switch, the problem went away.
Friday, October 30, 2015
ffmpeg supports both x265 and Kvazaar HEVC encoder
Tampere University of Technology has developed Kvazaar HEVC encoder since 2014. as LGPLv2.1-licensed open-source HEVC encoder. Their goals are
- Coding efficiency close to HEVC reference encoder (HM)
- Modular encoder structure to simplify its data flow modeling
- Efficient support for different parallelization approaches
- Easy portability to different platforms
- Optimized encoding speed without sacrificing its coding efficiency, modularity, or portability
- Reduced computation and memory resources without sacrificing its coding efficiency, modularity, or portability
- Excellent software readability and implementation documentation
Like x265 being used in FFmpeg,
FFmpeg can make use of the kvazaar library for HEVC encoding.
Go to https://github.com/ultravideo/kvazaar and follow the instructions for installing the library. Then pass
It is also added in the Libav FFmpeg fork. It could be interesting to compare this to x265.
--enable-libkvazaar to configure to enable it.H.265 / HEVC Encoders Comparison
Recently MSU Graphics and Media Lab compared the following video encoders:
HEVC
Non HEVC
with objective quality metrics SSIM (structural similarity) on two platforms:
x265 performed the best, then Intel MSS Hevc and x264. The x265 speed gains were mostly achieved by enabling Wavefront parallel processing on multiple cores and writing critical parts of the code in assembler.

The full free report is here.
x265 performed the best, then Intel MSS Hevc and x264. The x265 speed gains were mostly achieved by enabling Wavefront parallel processing on multiple cores and writing critical parts of the code in assembler.

The full free report is here.
Thursday, October 15, 2015
HEVC / H.265 Development Tutorial
1. Book and Slides
The book "High Efficiency Video Coding (HEVC): Algorithms and Architectures (Integrated Circuits and Systems) " is a good reference in addition to the spec. It covers
(1) High-level syntax of HEVC
(2) Block structures and parallelism
(3) Intra-picture prediction
(4) Inter-picture prediction
(5) Transform and quantization
(6) In-loop filtering
(7) Entropy coding
(8) Compression performance
(9) Decoder hardware architecture design
(10) Encoder hardware architecture design
Two good tutorial slides
(1) "Design and Implementa/on of Next Genera/on Video Coding Systems (H.265/HEVC Tutorial)" by Vivienne Sze, et al.
(2) "HEVC/H.265 Video Coding Standard (v. 2), Including Range, Scalable, and Multiview Extensions” by Dan Grois, et al.
2. Spec
ITU-I H.265 High efficiency video coding in ITU website.
3. Reference Software
The reference software for HEVC is called HM (HEVC Test Model). It is maintained in a Subversion repository. Please use a Subversion client to access the repository links directly or use the source browser for web browser access.
4. x265
5. Analysis Tool


Two years ago I compared the available HEVC/H.265 bistream analysis tools. Currently it seems Intel® Video Pro Analyzer (Intel® VPA) 2016 is the best.
Wednesday, October 14, 2015
OS X EI Capitan Perl error: Can't locate modules in @INC
Recently I upgraded my OS X from Yosemite to EI Capitan because many reviews showed EI Capitan run much faster than Yosemite. However I encountered a compiler problem when using perl
"can't locate xml/parser.pm in @INC"
It means XML::Parser module can't be found in Perl's include path (opt/local/bin/perl). To solve this problem, we may use CPAN (the Comprehensive Perl Archive Network). To get CPAN shell, run
> sudo perl -MCPAN -eshell
then install XML parser
cpan[2]> install XML::Parser
For other missing modules, we just install the requested modules, for example,
cpan[2]> install XML::Writer
"can't locate xml/parser.pm in @INC"
It means XML::Parser module can't be found in Perl's include path (opt/local/bin/perl). To solve this problem, we may use CPAN (the Comprehensive Perl Archive Network). To get CPAN shell, run
> sudo perl -MCPAN -eshell
then install XML parser
cpan[2]> install XML::Parser
For other missing modules, we just install the requested modules, for example,
cpan[2]> install XML::Writer
Tuesday, September 15, 2015
Xcode 6 - iPhone Simulator Folder
In Xcode 6, the location of the applications on the iPhone Simulator has changed (thanks to weimenglee). Prior to iOS 8, the location of the Documents folder of your app can be found here:
~/Library/Application\ Support/iPhone\ Simulator/<iOS_Version>/Applications/<application_id>/Documents
In xCode 6, the location of the simulator has changed to when resource files are required to put in [NSBundle mainBundle]:
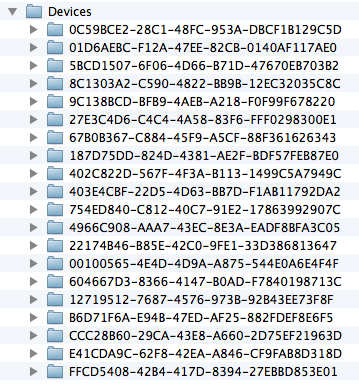
~/Library/Developer/CoreSimulator/Devices
Use Finder->Go->Go To Folder, we can see all device's UUID
Each folder correspond to a specific iPhone Simulator. To know which folder corresponds to which simulator, use the following command in Terminal:
~$ xcrun simctl list
Then all simulator devices are listed.
You can then go into this folder and the following path shows the folder that contains all the applications installed on this simulator:
~/Library/Developer/CoreSimulator/Devices/Device_UUID/data/Containers/Data/Application/
You can now locate your specific application and find the Documents folder:
~/Library/Developer/CoreSimulator/Devices/Device_UUID/data/Containers/Data/Application/App_ID/Documents/
Friday, September 11, 2015
Perl Problem Fix on Mac OS 10.10 Yosemite
When upgrade Mac OS X to Mac OS 10.10 Yosemite,
dyld: Library not loaded: /System/Library/Perl/5.12/darwin-thread-multi-2level/CORE/libperl.dylib
Referenced from: /Applications/someApp
Reason: image not found
Trace/BPT trap: 5 $ ls -l /usr/bin/perl*
-rwxr-xr-x 1 root wheel 58416 Sep 9 2014 /usr/bin/perl
-rwxr-xr-x 1 root wheel 35600 Sep 9 2014 /usr/bin/perl5.16
-rwxr-xr-x 1 root wheel 35600 Sep 9 2014 /usr/bin/perl5.18
-rwxr-xr-x 38 root wheel 811 Sep 9 2014 /usr/bin/perlbug
... $ sudo port uninstall perl $ sudo rm perl* $ sudo ln -s /System/Library/Perl/5.18 /usr/local/bin/perlFriday, September 4, 2015
Free Book "Fabless: The Transformation of the Semiconductor Industry"
A free PDF version of the book is being offered. It tells really nice history of the fabless semiconductor ecosystem.
You can access it via the attachment at the bottom of this wiki:
Only registered SemiWiki members can access this wiki. You may join with:
Wednesday, December 3, 2014
BLE Mesh Network and Internet of Thing (IoT)
Junko Yoshida published an analysis about "Mesh Network Key to Winning IoT Race":
As competing wireless networking technology providers gun for the smart home market, many contenders believe that the heart of the matter for the Internet of Things is its protocol for mesh networking.
The Bluetooth Special Interest Group (SIG) is reviewing mesh technologies for Bluetooth Smart proposed by companies like CSR and Zuli. Google, which recently unveiled its own Thread mesh networking technology, claims that any 802.15.4 wireless-capable devices will need only a software update to use Thread. Nest already uses a version of Thread in its products, and ZigBee is already built on mesh technology.
In this competitive environment, CSR is ratcheting up efforts to evangelize the company-developed mesh technology, CSRmesh, a protocol running over Bluetooth Smart (formerly known as Bluetooth Low Energy).

The UK firm released its first CSRmesh development kit last month. On Wednesday, it posted an introductory video to walk potential users through the process of getting started with the kit. The video explains what's included and how to download the necessary software, among other basics.
CSRmesh will allow consumers to control any Bluetooth Smart-enabled device in the home from wherever they are, including lighting, heating, appliances, and security systems. One element critical to the consumer experience: Solutions based on the CSRmesh protocol don't require the complex setup, pairing, or use of an access device such as a router.
At the moment, CSRmesh is not part of the Bluetooth Special Interest Group's officially approved Bluetooth Smart profile, nor is it part of any other standards body's specifications.
More importantly, CSR's isn't the only mesh technology proposed to the Bluetooth SIG.
In a recent interview with EE Times, Suke Jawanda, chief marketing officer at the Bluetooth SIG, was careful not to give an impression that CSRmesh is the chosen mesh technology for Bluetooth Smart.
SIG working groups are also reviewing a mesh technology developed by the San Francisco startup Zuli, Jawanda said. Zuli is using Bluetooth to build a mesh network for the smart home of the future. Its first product, which is being offered via Kickstarter, is a Bluetooth smart outlet.
"We are aware of CSR's intention" to donate code to the Bluetooth SIG, Jawanda said. There are 9 billion Bluetooth devices in use today, and 3 billion more are expected to be added this year alone. "Our review board needs to take a careful look" at the new mesh technology's implementation and how it interacts with devices. "The industry needs that rigor, and we don't want to be casual about it."
James Chapman, vice president of product marketing at CSR, remains optimistic. "We will find a venue to make [CSRmesh] available for the whole world to use it," he told EE Times this month. However, he would not discuss CSRmesh's progress at the Bluetooth SIG.
When asked what the industry needs to get the IoT market started, Chapman mentioned four things: "Range, multiple nodes for [many] devices, low power, and smartphone connectivity."
In his mind, technology like CSRmesh would provide range and multiple nodes; Bluetooth Smart would handle the rest.
Lee Ratliff, principal low-power wireless analyst at IHS Technology, agreed with that assessment. "We believe mesh technology is important for many IoT applications, especially those that require extended range or peer-to-peer communication."
Is the addition of mesh technology a prerequisite for Bluetooth Smart's success? Not exactly.
As competing wireless networking technology providers gun for the smart home market, many contenders believe that the heart of the matter for the Internet of Things is its protocol for mesh networking.
The Bluetooth Special Interest Group (SIG) is reviewing mesh technologies for Bluetooth Smart proposed by companies like CSR and Zuli. Google, which recently unveiled its own Thread mesh networking technology, claims that any 802.15.4 wireless-capable devices will need only a software update to use Thread. Nest already uses a version of Thread in its products, and ZigBee is already built on mesh technology.
In this competitive environment, CSR is ratcheting up efforts to evangelize the company-developed mesh technology, CSRmesh, a protocol running over Bluetooth Smart (formerly known as Bluetooth Low Energy).
The UK firm released its first CSRmesh development kit last month. On Wednesday, it posted an introductory video to walk potential users through the process of getting started with the kit. The video explains what's included and how to download the necessary software, among other basics.
CSRmesh will allow consumers to control any Bluetooth Smart-enabled device in the home from wherever they are, including lighting, heating, appliances, and security systems. One element critical to the consumer experience: Solutions based on the CSRmesh protocol don't require the complex setup, pairing, or use of an access device such as a router.
At the moment, CSRmesh is not part of the Bluetooth Special Interest Group's officially approved Bluetooth Smart profile, nor is it part of any other standards body's specifications.
More importantly, CSR's isn't the only mesh technology proposed to the Bluetooth SIG.
In a recent interview with EE Times, Suke Jawanda, chief marketing officer at the Bluetooth SIG, was careful not to give an impression that CSRmesh is the chosen mesh technology for Bluetooth Smart.
SIG working groups are also reviewing a mesh technology developed by the San Francisco startup Zuli, Jawanda said. Zuli is using Bluetooth to build a mesh network for the smart home of the future. Its first product, which is being offered via Kickstarter, is a Bluetooth smart outlet.
"We are aware of CSR's intention" to donate code to the Bluetooth SIG, Jawanda said. There are 9 billion Bluetooth devices in use today, and 3 billion more are expected to be added this year alone. "Our review board needs to take a careful look" at the new mesh technology's implementation and how it interacts with devices. "The industry needs that rigor, and we don't want to be casual about it."
James Chapman, vice president of product marketing at CSR, remains optimistic. "We will find a venue to make [CSRmesh] available for the whole world to use it," he told EE Times this month. However, he would not discuss CSRmesh's progress at the Bluetooth SIG.
Why mesh?
Devices that are part of a mesh network not only can signal information to other devices within the mesh network, but they can also receive such signals. Because the networks connects every device to every other device, any device within the network can receive all these messages, make inferences based on the content and timing of the messages, and send out additional messages. Presumably, somebody walking down a hall would trigger occupancy sensors in a sequence; lights would illuminate and doors would unlock and open accordingly.When asked what the industry needs to get the IoT market started, Chapman mentioned four things: "Range, multiple nodes for [many] devices, low power, and smartphone connectivity."
In his mind, technology like CSRmesh would provide range and multiple nodes; Bluetooth Smart would handle the rest.
Lee Ratliff, principal low-power wireless analyst at IHS Technology, agreed with that assessment. "We believe mesh technology is important for many IoT applications, especially those that require extended range or peer-to-peer communication."
Is the addition of mesh technology a prerequisite for Bluetooth Smart's success? Not exactly.
Watch the mesh: Qualcomm’s forward-looking move
Riccardo M. shared with his thought for the recent Qualcomm’s forward-looking move:

The recent bid for the British chip manufacturer CSR by Qualcomm is a clear symptom of the SmartHome war getting hotter on the mesh wireless protocol front.
It is worth pointing out that BLE has a definite advantage against all other contenders: it is natively supported by both Android and iOS Smartphones and tablets without the need of any hub or gateway. This is a feature wifi has as well, but the low power consumption sets BLE a step above.
An agnostic BLE with mesh extensions might become a de-facto standard in a scenario where a plethora of industrial protocols fight to take a place under the spotlight. In such an “everybody against everybody” war scenario I could imagine Apple supporting a mesh BLE but I have a harder time picturing an iPhone or iPad supporting Thread, ZigBee or Z-wave.
CSR’s knowhow on BLE Mesh might have been one of the most important reasons for its acquisition. When adding all the above to Qualcomm’s important role in the definition of AllSeen/AllJoin SmartHome normalization platform, I am tempted to consider them as the most forward-looking company in the SmartHome landscape that will play a key role in creating the interoperability the SmartHome market needs so badly in order to go mainstream.
Thursday, October 23, 2014
Ubuntu Desktop Fix
Sometime Ubuntu desktop was broken and no Dash Home and Launcher can be seen. So we need go to the 1st virtual terminal via "Ctrl + Alt + F1", and run "sudo apt-get install ubuntu-desktop", after installation, run "sudo reboot" and will see the normal Ubuntu desktop.
Tuesday, October 21, 2014
Android 5.0 Lollipop on Nexus 7 and Rooting
Android 5.0 Lollipop will be released in November. It is possibly the best and biggest update from Google.
 The Android 5.0 SDK is ready for download. The preview versions for Nexus 7 and 5 can be downloaded from Android L Developer Preview site.
It may be also rooted, thanks to the work provided by Wugfresh. Dallas Thomas gave a detail instructions.
The Android 5.0 SDK is ready for download. The preview versions for Nexus 7 and 5 can be downloaded from Android L Developer Preview site.It may be also rooted, thanks to the work provided by Wugfresh. Dallas Thomas gave a detail instructions.
Friday, September 12, 2014
Dropbox Print Service Tutorial on Android 4.4
yagi showed a nice tutorial for how to use Android 4.4 Kitkat Print Framework by a Dropbox PrintService.
PrintServices are plug-in components that know how to talk to printers via some standard protocols. These services serve as a bridge between the system and the printers. Hence, the printer and print protocol specific implementation is factored out of the system and can be independently developed and updated.
In other word, PrintService is a service that performs the detection of the printer, the processing of the print job. Addition to the role, such as a driver for the network printer, it can also be implemented as a service to be output to any location as a PDF file.
When you install an application that contains the implementation of PrintService, service will be added to the Printing screen of Settings. The user can launch the settings screen you can switch the On / Off of PrintService each, each PrintService provides.

PrintService is an abstract class that inherits from the Service. There are three abstract methods.
When the system starts the detection of printer, onCreatePrinterDiscoverySession method of PrintService is called. There is a need to return an instance of PrinterDiscoverySession is PrintService side at this time. During the detection of the printer, PrinterDiscoverySession is a class that encapsulates the interaction between the system PrintService. Each callback method of PrinterDiscoverySession class will be called, and printer can be added, updated, and deleted.
In the following section, an implementation example of PrinterDiscoverySession is showed with DropboxPrintService. It does not do anything except that you are adding a printer in onStartPrinterDiscovery method. PrinterInfo.Builder is created for printer information. You can specify printable paper size, color settings, such as resolution. if you pass a list of PrinterInfo in addPrinters method, printer information is displayed in the print dialog box. Create a PrinterInfo in onStartPrinterDiscovery within the method, it calls addPrinters method, but the detection is performed printer to start the thread normally, it will be able to add the printer information using the Handler, etc. .
When a printer is detected, the printing starts, PrintJob is passed to onPrintJobQueued method. Other printer ID, and FileDescriptor color information and print size, to a PDF file is included in the PrintJob. This is done using the FileDescriptor is taken out of print data. PrintJob will have a status start, finished, failed, and canceled. Should be set in accordance with the state of printing. The following is an example to save and retrieve the PDF from PrintJob. You have done all the work on onPrintJobQueued method, but will be using the AsyncTask, etc. usually. However, operation of PrintJob must be done on the UI thread. FileDescriptor of PDF data is similar. If you want to send to the network on the PDF data, you will need to use the AsyncTask on which the file was created, etc. time.
PrintJob so are queued automatically PrintService, you do not need to be the handling of the queue on your own again.PrintJob active can be retrieved in getActivePrintJobs method.
onRequestCancelPrintJob method is called when the user cancels the print job. PrintJob are passed, you need to stop the process corresponding. You can also check in isCancelled method of PrintJob class
Add PrintService to AndroidManifest.xml
In many cases, you will need to PrintService settings to connect to the printer over a network. Alternatively, you can configure the metadata when you define a PrintService in AndroidManifest.xml.
You can specify the metadata of AndroidManifest.xml the XML file that you create and define Activity of the setting screen.
When you have made all of your installed the DropboxPrintService, first log in to the Dropbox. Select the DropboxPrintService in Printing screen of Settings, turn ON the DropboxPrintService open the detail screen. Please log in to Dropbox so open the setting screen from the bottom menu.

Print
PDF is uploaded to Dropbox


PrintService
PrintServices are plug-in components that know how to talk to printers via some standard protocols. These services serve as a bridge between the system and the printers. Hence, the printer and print protocol specific implementation is factored out of the system and can be independently developed and updated.
In other word, PrintService is a service that performs the detection of the printer, the processing of the print job. Addition to the role, such as a driver for the network printer, it can also be implemented as a service to be output to any location as a PDF file.
Add and configure PrintService
When you install an application that contains the implementation of PrintService, service will be added to the Printing screen of Settings. The user can launch the settings screen you can switch the On / Off of PrintService each, each PrintService provides.


- PrintManager to display the Print dialog
- (Call of onCreatePrinterDiscoverySession method) that is required to start the session detection of printer from the system
- Return an instance of the class PrinterDiscoverySession
- Add a printer, delete, or update in PrinterDiscoverySession class
- User selects a printer and settings, then printing starts
- PrintJob is passed to the method onPrintJobQueued
- Printing process based on the information of PrintJob
PrintService Implementation
PrintService is an abstract class that inherits from the Service. There are three abstract methods.
One
Two
Three
Four
Five
Six
Seven
Eight
Nine
Ten
Eleven
Twelve
13
14
Fifteen
Sixteen
17
Eighteen
19
| public class SamplePrintService extends PrintService { Override protected PrinterDiscoverySession OenushiaruieitePrinterDiscoverySession () { // I return a search session objects for printer Return null ; } Override protected void OnPrintJobQueued (PrintJob ParamPrintJob) { // I to the printing process } Override protected void OnRequestCancelPrintJob (PrintJob ParamPrintJob) { // Cancel request }} |
onCreatePrinterDiscoverySession ()
When the system starts the detection of printer, onCreatePrinterDiscoverySession method of PrintService is called. There is a need to return an instance of PrinterDiscoverySession is PrintService side at this time. During the detection of the printer, PrinterDiscoverySession is a class that encapsulates the interaction between the system PrintService. Each callback method of PrinterDiscoverySession class will be called, and printer can be added, updated, and deleted.
| Item | Commentary |
|---|---|
| void onStartPrinterDiscovery (List | It starts the detection of the printer. Printer information is already discovered. It adds and updates printers in addPrinters method. It deletes printers in removePrinters method. |
| void onStopPrinterDiscovery () | Callback notifying you that you should stop printer discovery. |
| void onStartPrinterStateTracking (PrinterId printerId) | A callback that asks the user to start tracking of the status of the printer. It is called when the printer is selected in the Print dialog. You must notify the system as soon as possible when the state of the printer has changed |
| void onStopPrinterStateTracking (PrinterId printerId) | A callback to notify that the tracking of the status of the printer is finished. |
| void onValidatePrinters (List | A callback to seek validation list of PrinterId passed as if it were a valid. There is a need to update the printer information in addPrinters method if it is valid |
| void onDestroy () | It will be called when this session is determined to be unnecessary from the system |
In the following section, an implementation example of PrinterDiscoverySession is showed with DropboxPrintService. It does not do anything except that you are adding a printer in onStartPrinterDiscovery method. PrinterInfo.Builder is created for printer information. You can specify printable paper size, color settings, such as resolution. if you pass a list of PrinterInfo in addPrinters method, printer information is displayed in the print dialog box. Create a PrinterInfo in onStartPrinterDiscovery within the method, it calls addPrinters method, but the detection is performed printer to start the thread normally, it will be able to add the printer information using the Handler, etc. .
One
Two
Three
Four
Five
Six
Seven
Eight
Nine
Ten
Eleven
Twelve
13
14
Fifteen
Sixteen
17
Eighteen
19
Twenty
21
22
23
24
25
26
27
28
29
Thirty
31
32
33
34
35
36
37
38
39
Forty
41
42
43
44
45
46
47
48
49
Fifty
51
52
53
54
55
56
57
58
59
Sixty
61
62
63
64
65
66
67
68
69
70
71
72
| public class DiaruopibioxPrinterDiscoverySession extends PrinterDiscoverySession { Private Final Static String TAG = . DiaruopibioxPrinterDiscoverySession class .GetSimpleName (); Private Final Static String PRINTER_ID = "Dropbox.Print.Service" ; Private PrintService MPrintService; public DiaruopibioxPrinterDiscoverySession (PrintService PrintServie) { mPrintService = printServie; } Override public void OnStartPrinterDiscovery (List Log.D (TAG, "OnStartPrinterDiscovery ()" ); for (PrinterID id: printers) { Log.D (TAG, "PrinterID:" + Id.GetLocalId ()); } List NEW ArrayList PrinterId printerId = mPrintService.generatePrinterId (PRINTER_ID); PrinterInfo.Builder Builder = NEW PrinterInfo.Builder (PrinterID, "Dropbox Printer" , PrinterInfo.STATUS_IDLE); PrinterCapabilitiesInfo.Builder capBuilder = NEW PrinterCapabilitiesInfo.Builder (PrinterID); CapBuilder.AddMediaSize (PrintAttributes.MediaSize.ISO_A4, true ); CapBuilder.AddMediaSize (PrintAttributes.MediaSize.ISO_B5, false ); CapBuilder.AddResolution ( NEW PrintAttributes.Resolution ( "Default" , "default Resolution" , 600 , 600 ), true ); capBuilder.setColorModes (PrintAttributes.COLOR_MODE_COLOR | PrintAttributes.COLOR_MODE_MONOCHROME, PrintAttributes.COLOR_MODE_COLOR); builder.setCapabilities (capBuilder.build ()); addPrinters.add (builder.build ()); addPrinters (addPrinters); } Override public void OnStopPrinterDiscovery () { Log.D (TAG, "OnStopPrinterDiscovery ()" ); } Override public void OnValidatePrinters (List Log.D (TAG, "OnValidatePrinters ()" ); for (PrinterID id: PrinterIds) { Log.D (TAG, "PrinterID:" + Id.GetLocalId ()); } } Override public void OenuStartPrinterStateTracking (PrinterID PrinterID) { Log.d (TAG, "OnStartPrinterStateTracking (printerId:" PrinterId.GetLocalId + () + ")" ); } Override public void OnStopPrinterStateTracking (PrinterID PrinterID) { Log.d (TAG, "OnStopPrinterStateTracking (printerId:" PrinterId.GetLocalId + () + ")" ); } Override public void onDestroy () { Log.D (TAG, "onDestroy ()" ); }} |
onPrintJobQueued (PrintJob paramPrintJob)
When a printer is detected, the printing starts, PrintJob is passed to onPrintJobQueued method. Other printer ID, and FileDescriptor color information and print size, to a PDF file is included in the PrintJob. This is done using the FileDescriptor is taken out of print data. PrintJob will have a status start, finished, failed, and canceled. Should be set in accordance with the state of printing. The following is an example to save and retrieve the PDF from PrintJob. You have done all the work on onPrintJobQueued method, but will be using the AsyncTask, etc. usually. However, operation of PrintJob must be done on the UI thread. FileDescriptor of PDF data is similar. If you want to send to the network on the PDF data, you will need to use the AsyncTask on which the file was created, etc. time.
One
Two
Three
Four
Five
Six
Seven
Eight
Nine
Ten
Eleven
Twelve
13
14
Fifteen
Sixteen
17
Eighteen
19
Twenty
21
22
23
24
25
26
27
28
29
Thirty
31
32
33
34
| Overrideprotected void OnPrintJobQueued ( Final PrintJob PRINTJOB) { printJob.start (); File tmp = NEW File (GetExternalCacheDir (), PrintJob.GetDocument () . .getInfo () getName ()); FileOutputStream fos = null ; FileInputStream FIN = null ; TRY { fos = NEW FileOutputStream (tmp); FIN = NEW FileInputStream (PrintJob.GetDocument () . .getData () getFileDescriptor ()); int c; byte [] bytes = NEW byte [ 1024 ]; while ((c = Fin.Read (bytes)) = -! 1 ) { Fos.Write (bytes, 0 , c); } fos.close (); fin.close (); } catch (Exception e) { e.printStackTrace (); printJob.fail (e.getMessage ()); Return ; } finally { if (fos =! null ) { TRY {Fos.Close ();} catch (Exception e) {}} if (FIN =! null ) { TRY {Fin.Close ();} catch (Exception e) {}} } printJob.complete ();} |
PrintJob so are queued automatically PrintService, you do not need to be the handling of the queue on your own again.PrintJob active can be retrieved in getActivePrintJobs method.
onRequestCancelPrintJob (PrintJob paramPrintJob)
onRequestCancelPrintJob method is called when the user cancels the print job. PrintJob are passed, you need to stop the process corresponding. You can also check in isCancelled method of PrintJob class
One
Two
Three
Four
Five
Six
Seven
Eight
Nine
Ten
| protected void OnPostExecute (PrintStatus result) { if (PrintJob.IsCancelled ()) { I toast ( "has been canceled" ); } else if (Result.IsError ()) { printJob.fail (result.getMessage ()); } else { printJob.complete (); } toast (result.getMessage ());}; |
AndroidManifest.xml
One
Two
Three
Four
Five
Six
Seven
| Android: name = "App.Package.Name..YourPrintService" Android: permission = "Android.Permission.BIND_PRINT_SERVICE" > </ Intent-filter></ Service> |
Setting Screen
In many cases, you will need to PrintService settings to connect to the printer over a network. Alternatively, you can configure the metadata when you define a PrintService in AndroidManifest.xml.
One
Two
Three
Four
| Android: description = "@ string / description" Android: SettingsActivity = "App.Package.Name.YourSettingActivity" /> |
You can specify the metadata of AndroidManifest.xml the XML file that you create and define Activity of the setting screen.
One
Two
Three
Four
Five
Six
Seven
Eight
Nine
Ten
Eleven
Twelve
13
14
Fifteen
Sixteen
17
Eighteen
19
| Android: name = "App.Package.Name.YourPrintService" Android: permission = "Android.Permission.BIND_PRINT_SERVICE" > </ Intent-filter> Android: name = "Android.Printservice" Android: resource = "@ xml / Your_printservice" > </ Meta-data></ Service> Android: name = "App.Package.Name.YourSettingActivity" Android: exported = "true" Android: Label = "@ string / Title_activity_setting" Android: permission = "Android.Permission.BIND_PRINT_SERVICE" ></ Activity> |
DropboxPrintService
- Source is here → DropboxPrintService
- It does not include an API key towards the source, be sure to get the API key in Dropbox If you want to use it to build from source.
- apk here → DropboxPrintService.Apk
Log in to the Dropbox
When you have made all of your installed the DropboxPrintService, first log in to the Dropbox. Select the DropboxPrintService in Printing screen of Settings, turn ON the DropboxPrintService open the detail screen. Please log in to Dropbox so open the setting screen from the bottom menu.

PDF is uploaded to Dropbox


Subscribe to:
Posts (Atom)
